Home | Handbook for
Legionaries | Becoming a
Soldier of Rome | Contact Us | Calendar of Events | Members Page | Newsletter | Legio XI Photos
Handbook for Legionaries: Lorica
Segmentata
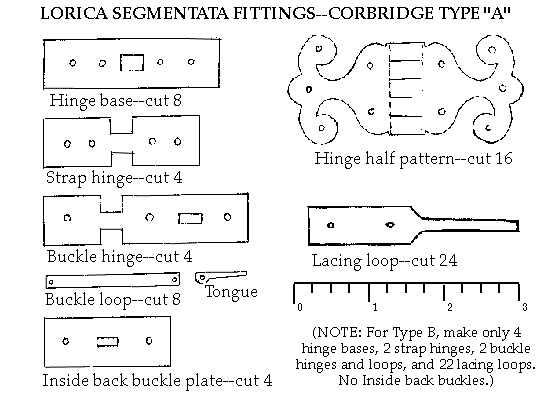
Click here for full-sized patterns
"Lorica" is Latin
for "armor"; "segmentata" is a
modern term applied to the classic Roman iron cuirass of bands or
hoops,
introduced by the late first century BC. Its origins are
unknown.
Recent finds at the
Mike Bishop has a website on
the lorica segmentata at www.loricasegmentata.org.
The following patterns
and guidelines are for a Corbridge type A cuirass, followed by options for the type B
lorica.
(Be aware of the subtle differences in detail.) Complete
drawings
are found in Excavations at Roman Corbridge:
The
Hoard. The Armamentarium website has photos and dimensions of
many of
the pieces: http://museums.ncl.ac.uk/archive/arma/contents/artefax/armour/bodyarm/segment/co/cuirass.htm.
Other photos can be seen on the Roman Hideout site, http://www.romanhideout.com/armamentarium.asp,
and at the Online Collection of Roman Artifacts, http://www.roman-artifacts.com/.
The names of the
various parts of the armor, and of the types of cuirasses, are purely
convenient modern terms and should not be tossed out to the public as
if the Romans
used the same wording.
|
|
The lorica is built in four sections: right and left collar sections
(with shoulder guards), and right and left girdle sections. On
each collar section the breastplate is hinged to the mid-collar plate,
which in turn is hinged to the top back plate, and below that the
middle and bottom back plates hang on internal leathers. Attached
to these plates by three more leathers are the upper shoulder guard
(front, rear, and center plates hinged together), and four lesser or
outer shoulder guards. The girdle sections are laced together at
front and back, and are suspended from the collar sections by means of
straps and buckles--4 at the inside back (2 each side), and 2 at the
front on the outside. (On the type B cuirass hooks and eyes are
used instead.) The collar sections connect to each other with a
horizontal strap and buckle at front and back. The lorica is best
put on like a jacket, with all the back closures tied and buckled, then
the front fastened. It helps to have someone hold the cuirass for
you while putting it on!
Construction of a full-scale cardboard mock-up (at least of the collar
plates and one pair of girdle plates) is HIGHLY recommended to assure a
good fit.
Click here
for full-sized patterns
Also see the page on Armoring Hints. |

|
|
|
|
Before you
start--
Make your subarmalis
before you
make your lorica! Padding on the shoulders is necessary to
make the
collar plates hang correctly, vertically instead of at an angle.
Padding
also makes armor VASTLY more comfortable to wear! It is not
necessary to
pad the body of the subarmalis, but you will want to protect your tunic
from
the armor. There are some good tips for sizing the lorica at http://www.uncg.edu/~tarule/sca/roma/lorica_segmentata.html.
Then spend a few days studying the patterns and making cardboard
mockups.
Lee Holeva has a page on modifying the
Albion Armorers lorica, http://www.geocities.com/legio_tricesima_cohors_tres/campusMartis/loricaSeg/loricaseg.html.
Plates
The basic material is 18-guage mild steel,
NOT glavanized or stainless. The
outside should
be scoured to a satin finish with medium-fine sandpaper and/or green "Scotchbrite" pot-scrubber pads before any
fittings are
attached. Your armor MUST be oiled to prevent rust!
Oils like
3-in-One, gun oil, or even WD-40 are fine, but don't use olive oil or
linseed
oil as they will make a sticky yellow coating. Some people use
car wax,
which seems to be effective though it may leave distinctive deposits
around the
fittings. ALWAYS wipe off your armor after wearing it, and check
it
frequently for signs of rust.
The insides of the plates originally would
have been black from the forge, so either heat blacken it or paint
black with a
rust-inhibiting paint. Alternatively, hot-rolled steel can be
used
instead of cold-rolled, the former being left blackened from the
forming
process. This black coating must be removed from the outsides of
the
plates before assembly--soaking in vinegar should remove much of it,
then
finish with fine sandpaper and Scotchbrite
pads as
normal. There is no evidence that the outside of the armor was
ever blued
or blackened; on the contrary, the Roman habit of tinning or silvering
their
brass and bronze suggests that they preferred a silvery finish.
In fact,
iron lorica plates from Carnuntum and
other sites
seem to be tinned as well. Frescoes and mosaics always show armor
as
either white/gray, for silvery or bright metal, or yellowish for brass
or
bronze. There are also literary references to shining armor.
In general,
the girdle
plates are 2-1/4" wide, or a little narrower. The outer (or
"lesser") shoulder guards are 2" wide--they are SHOULDER guards,
not arm guards! It is very helpful to have a sheet metal
shop cut
strips of these widths for you, so that you only need to cut them to
length.
There are 8 pairs of girdle plates, and 4 outer shoulder guards on each
side
(typically 2 long and 2 short, but see "Additional
Notes" below and the Patterns
for other options). The girdle plates overlap about a
quarter-inch,
though this can be increased slightly, or one pair of plates omitted,
for
people with shorter torsos. If more length is needed, the girdle
plates
may be widened a little. The shoulder guard plates also overlap
c.
1/4".
The length of the
left-hand girdle plates is one-half of your circumference (wearing tunic and subarmalis).
The
right-hand plates are about an inch and a half longer than that, to
allow for
c. 3/4" of overlap at front and back. All of the plates on each
side
are the same length, unless your torso is significantly wider at the
top than
at the bottom, in which case you must figure out how much to shorten
each
succeeding plate.
Click here for
full-sized
patterns
The edges of the collar
plates where they lie against the neck, the upper girdle plates under
the arms,
and the entire bottom edge of the bottom girdle plate can be rolled,
folded,
flanged or turned out, or "upset" or thickened. Upsetting is
hammering into the edge of the plate to create a thickened sort of
lip--it may
take some practice and is probably best done at a red heat.
Rolling or
folding edges is easier: simply bend over the edge (c. 1/4"
width) with a large pair of pliers, little by little, working back and
forth along
the piece. When the bend approaches 90 degrees, pound it over the
rest of
the way with a hammer. For a turned out or flanged edge, use the
same
method but simply stop when the desired angle is reached (anywhere from
30 to
90 degrees). Some edges were both upset and turned out, or folded
and
turned out. The outer edge of the outermost lesser shoulder guard
plate
can also be upset, rolled under, and/or flanged upwards.
Fittings
Fittings are
(and were) made of
brass. Metal snips or shears, small chisels, or a Dremel
tool can all be used for cutting, and small files are needed for
finishing the
edges. Be careful when using steel tools on brass, as they can
leave
permanent marks in the metal.
Folding the hinges can be made easier by annealing
the brass: heat it red hot in a gas flame and quench it in
water.
(Never work the brass while it is hot.) This wil
discolor the metal, but a 50/50 mixture of vinegar and water with a
little salt
will brighten it in minutes ("pickling"). Buffing or polishing
will restore a mirror polish. Brass that is not annealed should
be buffed
to remove any modern coating. All brass fittings may be tinned or
silvered.
HINGES are made from
.020" to .032" brass--3 sheets of 4"x10" hobby brass will
suffice. (.015" brass can be used for the upper shoulder guard
hinges, but may be too fragile for the collar plates and strap
hinges.)
For 8 hinges cut out 16 halves as shown--a finished hinge is a double
layer. Fold each piece in half with a 1/8" rod at the fold, and
strike with a square edge or clamp in a vise to form the "tube".
Alternatively, cut out rectangles of the
appropriate size, fold in the middle, and then cut out the hinge shape
(both
layers at once) using a jeweler's saw. This will assure that the
halves
line up, and less filing may be necessary.
|
Cut away
alternating sections of the tubes, or "saw" away with a coarse file, to
mate 2 halves together. Remember that
the top half will overhang the edge of its plate, and the lower
will sit flat about 1/4" back from the edge of its plate. At
right, you can see that the tubes of the upper half hang down over the
plate edge, while those on the lower half stick up from the face of the
plate. File well to make the edges even. |
|

Use c. 1/8" brass
rod for the hinge pins, peening or
flattening the
ends to keep them from slipping out. This can be tricky, since
the rod
will want to bend in the middle. Use careful, light taps
from a
number of angles. It might help to clamp the hinge between two
blocks of
wood, grooved to fit the hinge tubes, allowing only the ends of the pin
to
project. Trying to anneal the ends of the pin without softening
the
middle probably will not help.
Punch or drill the
rivet holes in the hinges, then assign each hinge to a specific place
on the
armor and mark it accordingly. Trace the holes of each hinge onto
its
appropriate plate, and drill or punch carefully. Remember, the
hinges are
all a little different, and their hole
patterns might
not be interchangeable.
These double-layer
hinges are very distinctive, and incorrectly-made hinges are easy to
spot.
Hinges that are cast, or made like a modern hinge with only a single
thick
layer that is rolled to form the hinge tube, are not permitted.
The stap and buckle hinges are made in a
similar fashion.
The buckles can be made from strips of sheet or from rod, the ends
flattened
and drilled for a 1/16"pin. The tongues are also made from
strip. Make 4 hinged strap and buckle sets, plus 4 buckles with
plates
but without hinges for the inside back--these were actually iron on at
least
one of the originals, so may be steel or brass.
|
LACING LOOPS are
most easily made from a strip of fairly thin brass,
.015" to .020" thick, 2-3/4" to 3" long by 3/8" to 1/2"
wide. To form the tongue, fold the sides inward to overlap
each other for half the length of the strip (making a triple layer),
then curl the tongue to form the loop. This is shown at right
(click for larger view). At top is the blank; next the edges have
been bent up using the wide-jawed plyers
shown (made for siding and gutter work). Regular plyers will work fine, but beware of tool
marks. Next, the edges have been folded in, one over the other,
and flattened carefully with a small hammer. This becomes the
BACK of the piece, so flip it over before curling the loop, as shown at
bottom. The seam is visible on the outside of the loop. The
entire operation takes about 2 minutes, and the finished loop is quite
strong. |
|

Most original lacing
loops seem to have been made from rod which was flattened for half its
length
to form the base. The rod will need to be thicker than 1/8"
in
order to spread out enough to form the base. You will need to
anneal it
several times while flattening. The rest of the rod will need to
be
thinned, however, before curling it into the loop, so this method is
rather
labor-intensive.
Lacing loops may also
be cut from 18-guage brass, as shown on the fitting patterns.
Twenty-four loops are
needed, and they are riveted at the bottom edges of the girdle
plates. On
the left side plates, the loops overhang the ends slightly, front and
back; on
the right they are set back about 3/4" from each end. There are
no
lacing loops on the bottom 2 pairs of girdle plates.
|
|
|
|
|
Top, type A
lobed hinge; below, buckle and strap fittings with fancier hinge
bases. Most strap and buckle hinges were simply rectangular,
though some had concentric circles stamped around the rivet holes. |
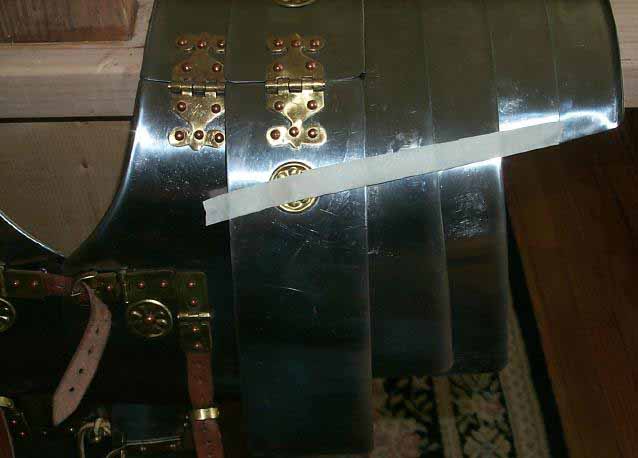
Front and back
of collar and shoulder guard section. The white tape shows the paths of
the internal leathers. The main hinges are more of a type B shape
than type A. |
Detail of strap
and buckle fittings. This lorica and that at center both by Joe Piela, Lonely Mountain Forge. |


|
BOSSES are stamped out of thin brass (.010"), and are available from
the CO. A typical example is shown at right, one inch in diameter; some were fancier but others
were plainer. The die for this boss was made from a piece of 3/4"
round brass rod. There was a screw hole in one end, and the edges
were rounded off a little with a file. Then cuts were made across
it with a file or hacksaw to make the radial "floral" design. The
discs were first stamped with a 1" metal ring to raise the edge, then stamped with the die. The stamping was
done with heavy scrap leather under the brass. The stamping can
be done in a single step, of course, if the diameter of the die matches
that of the disc. Some solid brass cabinet knobs have a similar
floral pattern and might be used as dies. |
|

Two very nice styles of stamped boss are
now
offered by Geoffrey Withcliff, geoffreywi
AT comcast DOT net. La Wren's Nest (and possibly
other Deepeeka vendors) also sells Deepeeka
stamped brass lorica bosses which are quite good, as does CLANG Armory.
|
|
Photo by Richard
Campbell of original lorica segmentata
fittings in the |
Rivets
Three types of rivets are used:
flat-headed, small domed, and large domed. The flat-headed type
(1/8" diameter shank) is used for riveting the girdle plates and lesser
shoulder guards to their internal leather straps, and about 130 are
needed. They are put in place from the inside, first through the
leather
and then the metal, and hammered flat outside the steel--no washers are
used.
About 160 small domed rivets (1/8" diam.
shank) are needed for the hinges and loops. 24
large ones (3/16" shank) are used for attaching the upper shoulder
guards
and back plates to their leathers--some of these also secure the
stamped
bosses. (Optionally, small domed rivets may be used in place of
the larger
ones.)
The zinc
content of
Roman rivets was apparently quite low (5 to 10%), so plain copper is
recommended but brass is acceptable. (The commonly-found copper
rivets
with 1/2" diameter heads with concentric circles should be avoided;
copper
roofing nails or carpet tacks are actually more authentic.)
Rivets may be
purchased from RJ Leahy Co. and other sources on the Suppliers page.
Since the large domed rivets must be peened
(flattened) over leather, about 24 washers are
needed. Draw a grid of 1/2" squares on .015"-.032" brass,
put a hole through each square, and cut along the lines. (Don't
try to be
too neat about this!)
Drill all holes no
larger than necessary for the rivets to go through. Remove burrs
with a
file or small grinder. Put each rivet in place and cut off the
excess
shaft close to the surface of the metal or washer--about 1/16", plus
any
"peak" left by the cutters.
Flat-head rivets being peened
are simply rested on a convenient hard surface, but for dome-heads, a
riveting
tool is essential. This is just a chunk of metal with a couple
shallow
holes drilled into it, in which the rivet heads can rest so that they
stay
domed. Washers can be held with masking tape to prevent them from
jumping
off while their rivets are peened (see Armoring Hints).
Leathers
The best leather to use is 5-ounce tooling
leather with a good coat of neatsfoot or
similar
oil. Anything thicker will reduce the flexibility of your
lorica.
Waxed or chrome-tanned leathers may be stretchy--beware. Also see
the Leather Tips
page.
The 6 girdle plate leathers are
c.1-1/2" wide by c. 14" long. The pairs of holes are
1-5/8" to 2" apart (depending on your height),
except that the uppermost pair on the middle leather for each side is a
little
lower (because of the rolled edge at the middle of the top plate).
Each trio of backplates
is riveted to a pair of leather strips 7" to 8" long by 3/4"
wide. These extend below the bottom back plate to reach the
buckles
inside the top girdle plate. The shoulder guard leathers (3 on
each side)
are also 3/4" wide. The back ones are roughly 10" long, the
front and middle about 8-1/2".
|
|
At left, inside back of a Corbridge Type A
collar section (by Joe Piela). The
two leathers which connect the three backplates
extend downwards to go through the buckles inside the top girdle
plate. The top rivet on the outer one also secures the rear
leather of the shoulder guards. The top shoulder guaard leather is also visible at upper
left. At bottom is the rear girdle plate leather with its pairs
of rivets--it has been trimmed away to fit around the buckle! A
little adjustment in placement can avoid this problem, or the leather
can be riveted below the buckle rather than next to it. Note
folded edges of collar plates, and square washers used only where
rivets are placed from outside.
Below, inside of a Corbridge type B collar
section, with a better view of the shoulder guard leathers. The
folded edges of the collar plates are also visible. This was our
very first lorica, so the plates have not been blackened and brass
rivets were used instead of copper. Note that the backplates are fastened to a
single rectangular leather, though the paired leathers used on
type A are also an option. The large copper rivet at middle left
on that leather is a repair. (Also see photo of same piece in "Type B
Lorica" section below).
|

Assembly
The best way to build a lorica is to start
with the HINGES. Once you conquer those and the strap and buckle
fittings, the rest is downhill! When all the brass fittings are
done, cut
out the plates, file the edges, paint or heat blacken the backs, fold
the edges
where necessary, and curve them to shape.
The upper shoulder guards,
mid-collar plates, and tops of the breastplates must be curved to fit
the
shoulders before they are connected by their hinges. Assemble the
collar
units with the backplates, and put all
the strap and buckle sets in place. The lesser shoulder
guards are
curved to fit, then riveted to their leathers, starting with the
outermost
one. They are next attached to the collar units, and the upper
shoulder
guards are riveted on last.
The girdle plates are all the same length,
and the rivet holes for the leathers are all in the same place on each
plate. Do not attempt to "compensate" for the slight offset of
the plates as they nest together by moving the rivet holes or making
the upper
plates longer than the lower ones.
The lacing loops and
buckles can be riveted on before the girdle plates are curved, but it
may be
easier to curve the plates without the fittings in place. The
girdle
plates are more U-shaped than semi-circular--shape the bottom plate
first and
make each plate fit the one below it. Then check the fit of the
top
plates. They must not stick out and press against the insides of
your
upper arms (this can cause discomfort and numbness!). If the
girdle
plates are slightly too long it is better to reshape them so that any
looseness
of fit is at front and back rather than at the sides. Finally,
assemble
the girdle sections, again working from bottom to top. It is best
to
punch only one hole of each pair in the vertical girdle leathers before
assembly, since the distance between the rivet holes in the plates may
vary. Mark and punch the second hole of each pair as the plate is
being
riveted in place.
|
|
LACING THE
LORICA |
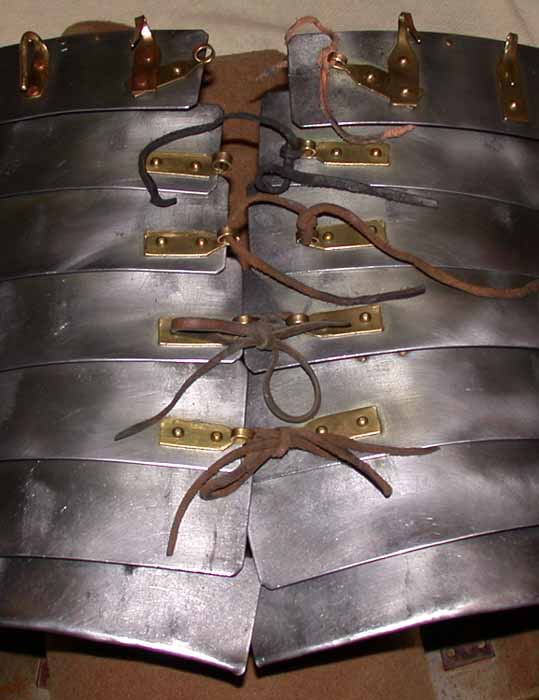
|
Seperate patterns for the type B
lorica are provided, but type A patterns can be adapted, if you prefer.
On Matthew Amt's lorica at right, the mid-collar plates have been
riveted to the breast- and backplates
because the hinges broke from long use. The rear buckle is a
replacement, as are several of the larger rivets. |
|


The finds at Corbridge,
on which these plans and instructions are based, included six collar
sections,
numbered as cuirasses 1 through 6. The first four are type A,
while
cuirass 5 is type B and cuirass 6 is type C. There were also six
girdle
sections, labeled as cuirasses i through vi,
again
with the last two being type B or C. A number of the assemblies
are
missing one or more plates. There are the
proper number
of right and left halves to assemble three more or less complete loricae, but this is probably by chance since it
is clear
that no two of the shoulder sections match.
The type A collar plate and lesser shoulder
guard patterns
on this site are
copied from cuirass 1, though the upper shoulder guard is taken from
cuirasses
2, 3, and 4. Cuirass 1's upper shoulder guard was clearly a
retrofitted
type B, presumably as a repair. The hinges and bosses are very
different
from those on the collar plates, but they matched those on cuirasses 5
and 6
(type B). Cuirasses 1 and 5 have four outer shoulder guards, two
long and
two short, and virtually every modern reconstruction is built that
way.
On cuirass 3, however, all four plates are short, and there doesn't
seem to be
any suggestion that two of these are simply longer plates with the ends
broken
off. Cuirass 4 has only three plates, and cuirass 2 has only two
(though
rather wide at 2-3/8"), but it is very difficult to say if this was how
they were made or if plates have been lost.
Wearing a lorica segmentata does NOT mean
that you are limited to wearing an
Imperial Gallic helmet! This is a modern stereotype. Any
acceptable
helmet that is
appropriate to the impression is an option, including Coolus
and Montefortino types.
There is no evidence
that the lorica was ever made of anything other than iron. While
there
are a couple surviving pieces of rawhide lamellar armor from the third
century
AD, and one or two literary references from that period or later, the
many
finds of leather objects from the Republic or early Empire have never
included
armor parts. On the other hand, brass lorica fittings are common
finds
all over the Empire, and they are often still riveted to pieces of iron
or
rust. There are also a number of literary references to armor
shining in
the sunlight.
Likewise, there is
really nothing to suggest that the famous muscled cuirass was ever made
of
leather, but rather polished or silvered bronze, or possibly iron
(ditto for
the accompanying greaves). (See the page on Organization and
Officers.)
Color depictions of body armor are not common, but they consistently
show it as
yellow/gold or silver/gray, never as brown or black. Metal was
more
protective than leather, and did not get soft when wet. The
higher
officers such as tribunes and legati were
aristocrats
who would have wanted to be as shiny as possible, and the cost of the
armor
would have been irrelevant.
Leather was definitely
used at least sometimes for the subarmalis, worn
between
tunic and armor. The pteruges or
flaps often
seen in Roman artwork would have been attached to the subarmalis, and
could
certainly have been leather. The Romans did dye leather
sometimes, but
what colors might have been used for pteruges
is
unknown.
Beware of
Click here for full-sized patterns
Click here for notes on the earlier Kalkriese lorica.
Click here for notes on the 2nd-century Newstead lorica.
Click here for notes on
the Manica or
segmented Armguard.
--Details on
Mike Bishop's new Lorica Segmentata
volume are on the Armatura
website: http://www.armatura.co.uk/
Custom armorers are an option, Lonely Mountain Forge
being one of the best. Matt Lukes in
The latest version of Deepeeka's lorica is
vastly improved from their earlier
attempts, and should be acceptable but has not been closely inspected
yet. Be aware that some vendors might have older versions in
stock, and
might not know (or care) what the differences are.
Don't even bother with
Museum Replicas/Windlass Steelcrafts.
Aside from being a bad copy of the outdated version of the Newstead
lorica, it is too long, too heavy, and does not fit well. There
are many
other places to get a bad lorica, so please check with the Commander
before
ordering.
Legio XI/11th Legion
Clavdia Pia Fidelis